

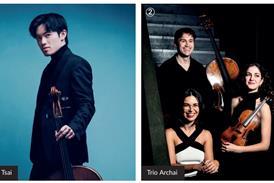


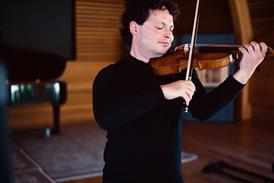



Steve Reich’s Violin Phase challenges performers to navigate technology alongside complex rhythmic and interpretative demand. Pwyll ap Siôn presents practical, technical and musical advice, plus insights from violinists who have tackled Reich’s unique work
Discover more Featured Stories like this in The Strad Playing Hub
Steve Reich’s Violin Phase (1967), for violin and tape or four violins, occupies a unique position in his music for strings. While phasing is central to Reich’s identity as a composer, this is the only one of his string works where a player must physically engage with the technique. The following offers a step-by-step guide on how to perform the piece.
The pre-recorded element
Before getting to grips with phasing – and the other technique that Reich uses in it, resulting patterns – you’ll need to spend a bit of time creating a three-track loop for the tape part (unless you already have access to an existing backing track). Another option is to perform the piece entirely live, for which three other violinists will be needed to make up the quartet.
The playing score for Violin Phase (UE 16185) offers detailed instructions on how to prepare these backing tracks. Anyone with access to a digital audio workstation, such as Logic Pro or GarageBand, a decent microphone, and some practical knowledge of recording techniques, should be able to manage this without too much difficulty. It’s certainly easier to produce the backing tracks today than it would have been back in the late 1960s, when it was written!
Laying down tracks and duplicating one’s own parts forms an essential part of the process. As violinist Darragh Morgan states, it’s of paramount importance that the backing tracks are rendered as accurately and precisely as possible. Once in place, the live part effectively becomes ‘the cherry on top of the cake’.
Projecting the perfect riff
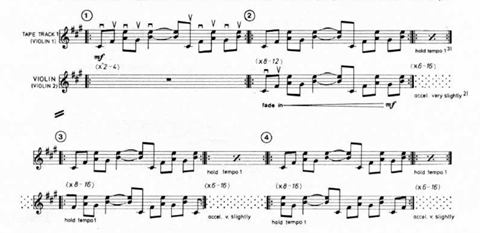
A successful performance of Violin Phase rests on how the violinist chooses to articulate the opening ten-note, twelve-beat pattern, or ‘riff’, which first appears in Rehearsal 1 (see Example 1). This pattern forms the basis for both the recorded and live parts.
For London Sinfonietta principal violinist and Colin Currie Group member Jonathan Morton, it’s important that the pattern should feel right: ‘Because you’re going to be repeating that opening pattern a lot, it’s something that must feel right in the body, especially in the right arm and bow. There should be flexibility, elasticity, bounce, and energy to the bowing arm.’ The articulation should flow naturally from there.
‘It’s a simple pattern’, says Morton, ‘so you just want to emphasise the clarity of it.’
Feeling comfortable with the pattern is crucial. This is best achieved through trial and error. As Morton explains: ‘You should find your way into the piece by trying the ranges of dynamics and stresses in the pattern until you land somewhere which feels like “I could groove this for a while”.’ The pattern should retain a kind of joyful quality rather than a sense that ‘this is going to be a marathon’.
‘It’s a simple pattern, so you just want to emphasise the clarity of it’
For violinist Darragh Morgan, this joyful quality becomes easier once the pattern’s dance-like qualities are captured: ‘Violin Phase contains a very cool riff,’ he says, ‘so there needs to be the right type of buoyancy in the articulation’. He explains: ‘When it comes playing the pattern in Violin Phase, for me it has to be an off-the-string approach which is totally non-vibrato’. To aid with this buoyancy, Morgan suggests using a collé stroke alongside staccato. With both elements in place, it becomes much easier to lay down the tracks for the other pre-recorded violin parts.
Achieving the right balance between buoyancy and weight depends on the right hand’s bow control as much as it does on the left hand. Morgan elaborates further: ‘Because Violin Phase is very much based thematically on string crossing, the collé stroke links to staccato articulation, which then links to how we rotate the bow back and forth across the string crossings.’
Playing a pattern containing several string crossings and double stops can induce fatigue and even physical pain through repetitive strain injury (RSI). Intonation can suffer as a result. As Phaedra Ensemble violinist Phillip Granell points out: ‘You have C sharps, F sharps, G sharps and Bs, and double-stops on B and E. You must hold these positions more-or-less continuously for over 15 minutes. If the double-stops start to slip after a while, it becomes really noticeable.’
The live violin also constantly fades in and out of the texture, so the performer must feel comfortable playing the pattern quietly while matching the articulation of the louder recorded parts. As Granell attests: ‘It’s hard enough when you’re working on it in the practice room, but trying to do it in a concert situation is even harder. You need to be so cool when playing Steve Reich’s music!’
Phasing … and how to do it
For any violinist approaching Violin Phase for the first time, phasing is its most challenging aspect. The whole process can feel very disorientating. As Morton explains: ‘If you’ve never phased before, it’s a totally weird experience. Your brain is constantly fighting the feeling. Your rhythmic immune system kicks in big time because you’ve always trained your rhythmic radar to always lock in with what you’re hearing. With phasing, you’re being asked to do the precise opposite, which is really hard.’
How does it work? The violinist begins by playing a pattern in unison with the pre-recorded backing track (or another player if performing the piece entirely live). Once established, the soloist ever-so-slightly increases their speed until one quaver beat ahead of the tape part (or other player). The two parts briefly move out of phase before locking once more onto a different phase position, like two cogs in a wheel.
The best approach when learning how to phase is to first feel comfortable playing (or more importantly, hearing) the second phased position, which in Violin Phase appears as Rehearsal 3 in the score (See Example 1, above).
At this point, the live player should be one quaver (𝅘𝅥𝅮) ahead of the original pattern. Once this phase position is securely within your grasp, you should go back to Rehearsal 2 (where you are in unison with the pre-recorded pattern) and ever-so-gradually increase your tempo until you feel yourself locking in with the sound of the pattern heard in Rehearsal 3. Once you’ve mastered the transition from Rehearsals 2 to 3, try doing the same with subsequent phase positions between Rehearsals 4 & 5, 5 & 6, and then 6 & 7. It should become easier when each phase position is broken down are rebuilt in this way.
Resulting patterns
The point with phasing is that the interlocking parts form new and interesting rhythmic and melodic combinations – patterns that appear out of the combined lines of two or more violins locking together in different phase positions. Reich calls these combinations resulting patterns.
Alongside phasing, the violinist must decide how to execute these resulting patterns. For Morton, the key challenge is to make them sound like an organic part of the music’s rhythmic and melodic tapestry. Being able to hear and visualise the resulting pattern before playing it is vital: ‘You should try to match what you hear in your playing rather than play what looks on paper like a long tune or a stream of notes.’ He warns that if you can’t hear the resulting pattern, you’re most likely ‘throwing the pattern into the dark and hoping it will just somehow magically line up,’ which it may not do.
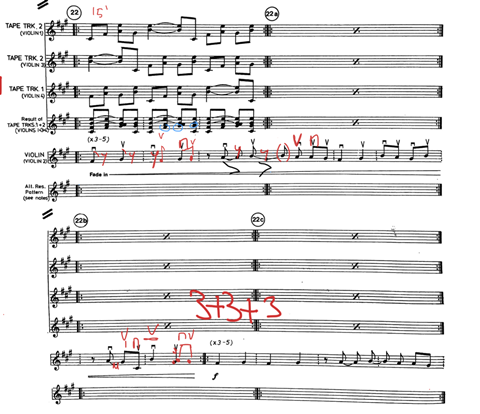
By hearing the resulting patterns before playing them, the effect becomes far more integrated and organic. In the score for Violin Phase, Reich also encourages the performer to create their own resulting patterns, adapting or tweaking those patterns that already appear there, as seen in Morton’s annotations from Rehearsals 22, 22a and 22b (see Example 2), where he makes some changes to Reich’s suggestions.
Ultimately, Violin Phase requires the violinist to balance precision with instinct – to establish the riff physically and hear the phasing internally, thereby allowing the resulting patterns to emerge organically from the interaction between the live and recorded parts. With these pointers in mind, a convincing performance of Violin Phase should be within any violinist’s grasp.
In our November 2026 issue, Pwyll ap Siôn talks to leading players of Reich’s work to find out how they deal with its challenges. The November 2026 edition of The Strad is on sale now.












No comments yet